Just update to a new iPhone and want to move some pictures from your home Mac to it? We've got you covered.

Don't have PrimoPhoto? Download it now prior to reading this guide and it will save you quite a lot of time. Click Here to Free Download
"I transferred all my camera roll photos to my Mac to create albums with them but I accidentally delete some photos from my iPhone and now I want them back to my iPhone from Mac." A user questioned in Yahoo Answers. You probably have bumped into situation like this before.
To move photos from Mac to your iPhone, here are a couple of conventional technics for you like iTunes, AirDrop, or iCloud Photo Library. If there are only few pictures to be transferred or you can totally put up with the huge iTunes program, the mentioned methods can be a passable choice. We have summarized both the old school ways as well as a new iPhone Photo Transfer solution to have your back.
If you just need to transfer a small part of photos from Mac to your iPhone and AirDrop is working on your iPhone, you can try this method.
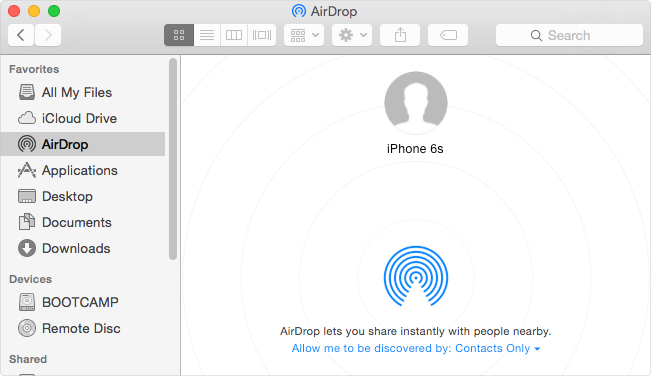
Step 1. Enable AirDrop on your iPhone. On your Mac, go to Finder > Click on AirDrop in the sidebar > Enable it.
Step 2. You should see your iPhone show up in the window on your Mac.
Step 3. Drag and drop a photo onto that little circle. On your iPhone, you will then receive a notification on your iPhone to accept the photo.

Transfer Photos from Mac to iPhone via AirDrop
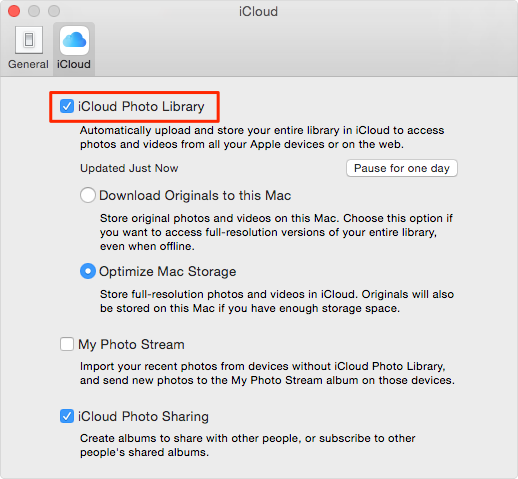
Firstly, you'll want to make sure that iCloud Photo Library is enabled on both your Mac and your iPhone.
Step 1. Enable iCloud Photo Library on Mac, open up Photos app > Click Photos that next to the Apple icon > Select Preferences> Make sure iCloud Photo Library is checked.
Step 2. Enable iCloud Photo Library on your iPhone, Settings > iCloud > Photos > Toggle iCloud Photo Library to on position.
Step 3. Just drag and drop the photos to your Photos app on Mac, and they will show in the photos app on your iPhone in few minutes depends on your Internet connection.

Transfer Pictures from Mac to iPhone with Photos App
iTunes is a huge program to run and the interface is kind of unfriendly to fresh users. One thing to remember is that iTunes will wipe the previous photos you synced with it.
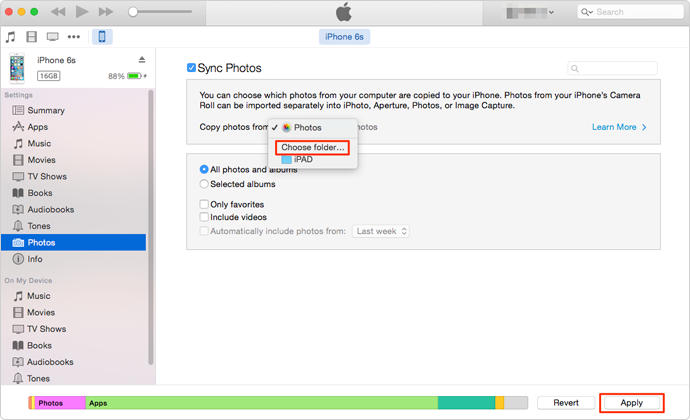
Step 1. Save the photos you need to transfer in a folder on the desktop. Connect your iPhone to Mac, open iTunes, if it doesn't open automatically.
Step 2. Click on your iPhone in the top bar, and then click the Photos tab.
Step 3. Check the "Sync Photos" box. Select "Choose folder" from the drop-down menu.
Step 4. Browse to the folder you made, and click Apply.

Transfer Pictures from Mac to iPhone Using iTunes
Want a 2-minute solution to get photos from Mac to your iPhone? PrimoPhoto is the way you are looking for: Easy, Quick & Intuitive. Just plug in with your iPhone (and even your friend's iPhone), and drag the photos from your Mac to PrimoPhoto, and then transfer the photos to the album you made on your iPhone directly.

Designed to fit effortlessly into your iPhone photo management
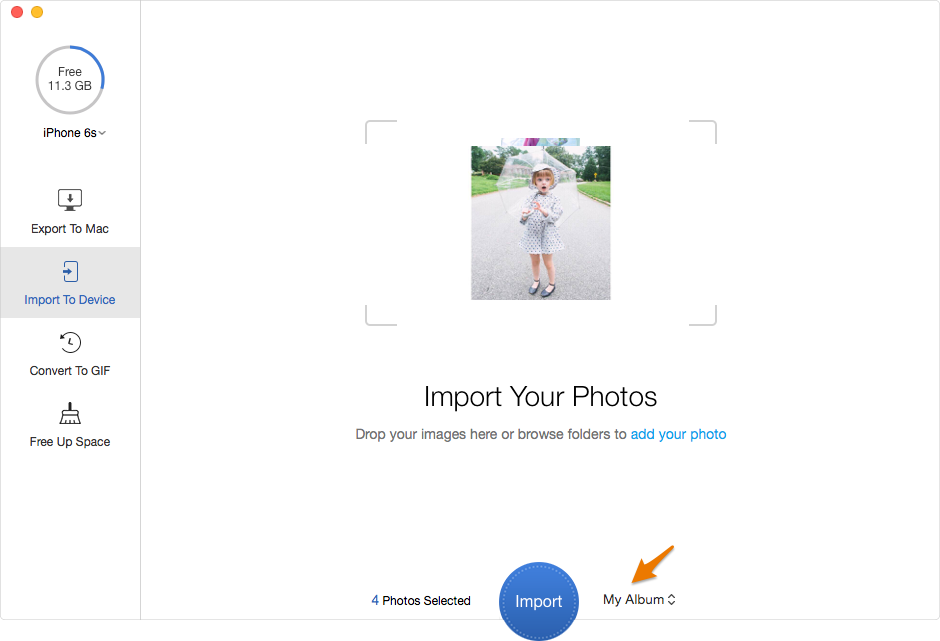
Download NowStep 1. Run PrimoPhoto on your Mac, and connect with your iPhone.
Step 2. Click on Import to Device option. Now just drag the photos from your Mac to PrimoPhoto.
Step 3. Then import the photos to the Album you like on your iPhone.

Transfer Pictures from Mac to iPhone Using PrimoPhoto
We can draw a short conclusion after trying the above methods, and PrimoPhoto is simpler and quicker for transferring a bunch of photos from Mac to iPhone, and to the specific iPhone album:
1. AirDrop is ok if you only need to transfer a few photos from your Mac to iPhone.
2. iCloud Photo Library is kind of confusing and sometimes after you drag the photos to the Mac photos app, the pictures won't appear on your iPhone because of the poor Internet connection.
3. iTunes is a large program to run on Mac and it usually slow down your computer, the interface is also kind of complex for newbies.

Fiona Wang Member of @PrimoSync team as well as an Apple fan, love to help more users solve various types of Apple related issues by writing iOS-how-to tutorials.