Want to transfer iPad photos to Mac but do not know how? Read this guide to get 3 methods to help you make it.

Don't have PrimoPhoto? Download it now prior to reading this guide and it will save you quite a lot of time. Click Here to Free Download
People always like taking photos to record the memorable moments in everyday life. For iPad users, you may often use it to take high quality photos with its amazing built-in digital camera. Now, in order to have a better Apple life, you just buy yourself a brand new Mac for enjoying.
Afraid of losing iPad pictures, you may think about transferring photos from iPad to your new computer as backup in case your iPad run into any problems. To help you transfer iPad photos to Mac smoothly, this article will show you how to import iPad photos to Mac in 3 different situations.
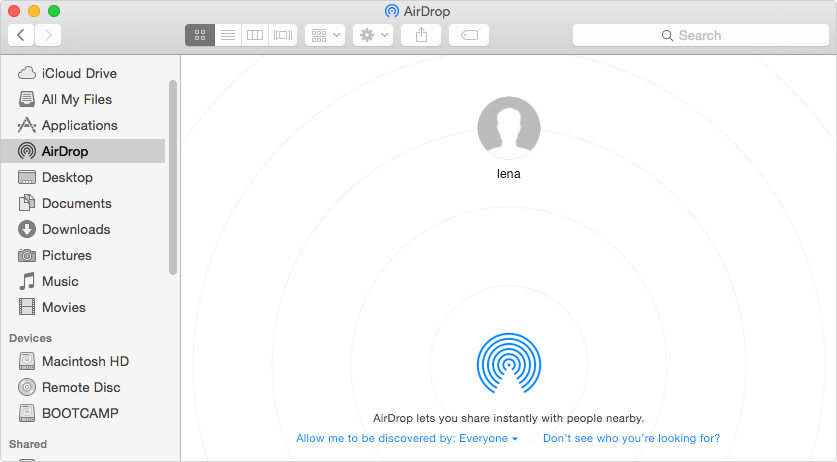
Apple's AirDrop function enables you to share photos, videos and more to a nearby Apple device wirelessly. So, if you only need to transfer a few pictures from iPad to a Mac computer, you can try this method on the condition that:
1. On your iPhone: Swipe up to open the Control Center > Tap on AirDrop > Choose from Contacts Only or Everyone as per your need.
2. On your Mac: Open Finder > Click on AirDrop. The AirDrop will turn on automatically when the Wi-Fi and Bluetooth are on.
3. Go to Photos app > Select the photos you need > Tap on Share button > Tap your Mac name.
That's it. It is easy to transfer a small amount of photos to Mac by using AirDrop. Want to transfer a large number of camera photos in minutes? Keep reading the next method.

Photos app was released in 2014 to replace the old iPhoto and Aperture. It might be the best choice to import camera photos to Mac. You can easily select the photos you need, and it can automatically delete your iPad photos once they have been transferred to your computer to help you free up your iPad space. Before the transfer, you should know:
1. Connect your iPad to computer.
2. Launch Photos app if it does not open automatically.
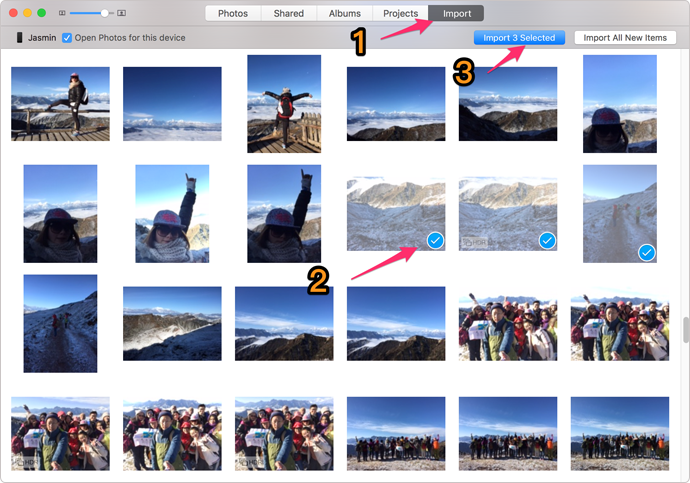
3. Click on Import button > Select the photos you want to transfer > Click on Import xxx Selected. Or you can click on Import All New Items to transfer the new photos.

Transfer Photos from iPad to Mac with Photos
Photos app can only help you import photos that saved in Camera Roll. What about the photos that synced from iTunes? That's why PrimoPhoto appears. It is an all-round iPad/iPhone photo manager that allows you to have a full control of your treasured photos. With PrimoPhoto, you can:

Designed to fit effortlessly into your iPhone photo management
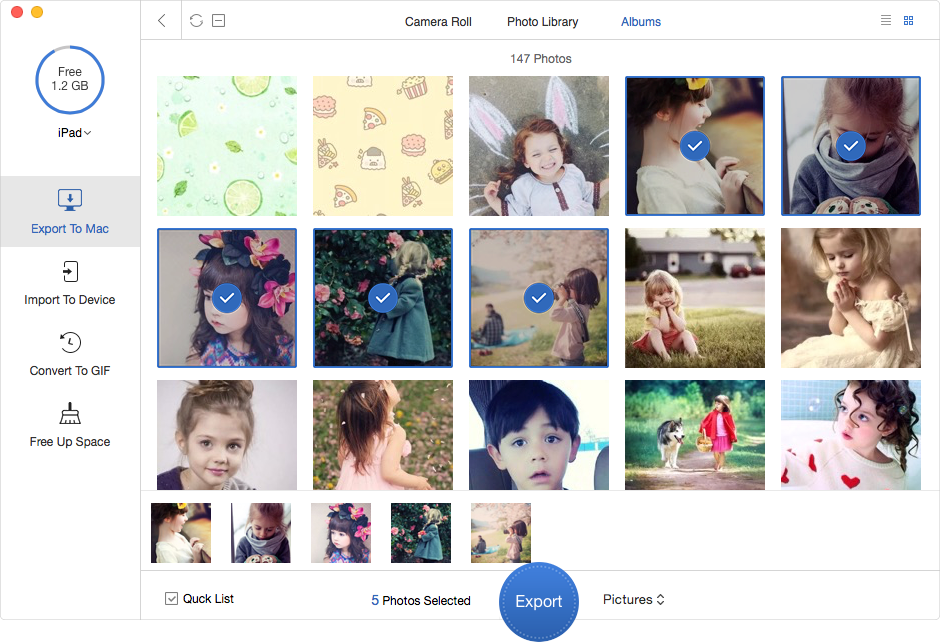
Download Now1. Open PrimoPhoto on your Mac > Connect your iPad to computer.
2. Click on Export to Mac > Choose one category from Cameral, Photo Library or Albums.
3. Select the photos you want to transfer > Choose one folder to store your photos.
4. Click on Export button.


Lena Member of @PrimoSync team, an Apple fan as well as an anime lover. Like to share solutions on Apple related problems.