Take too many photos with your iPhone 6s and want to transfer your photos from iPhone to Mac as backup? Find 3 methods in this quick guide.

Don't have PrimoPhoto? Download it now prior to reading this guide and it will save you quite a lot of time. Click Here to Free Download
The all-new 12 megapixels camera makes it a great experience to take photos with iPhone 6s/6s Plus, especially for those Apple-toting photographers. The new iPhone also equipped with the ability to shoot 4K videos, and it is going to take up more space on your iPhone than regular HD, for example, 30 seconds 4K video is about 180MB.
If you take a lot of photos and 4K videos with your iPhone 6s, that's going to eat up the tight iPhone storage. Get pictures to your Mac hard drive and then remove them from your iPhone is a recommendable way to save iPhone storage. This article describes the most common ways to transfer photos from an iPhone 6s/6s Plus to Mac.
How to shoot a 4K video on your iPhone 6s? Go to Settings > Scroll to Photos & Camera > Tap on Record Video > Select 4K at 30 fps to enable 4K video recording.
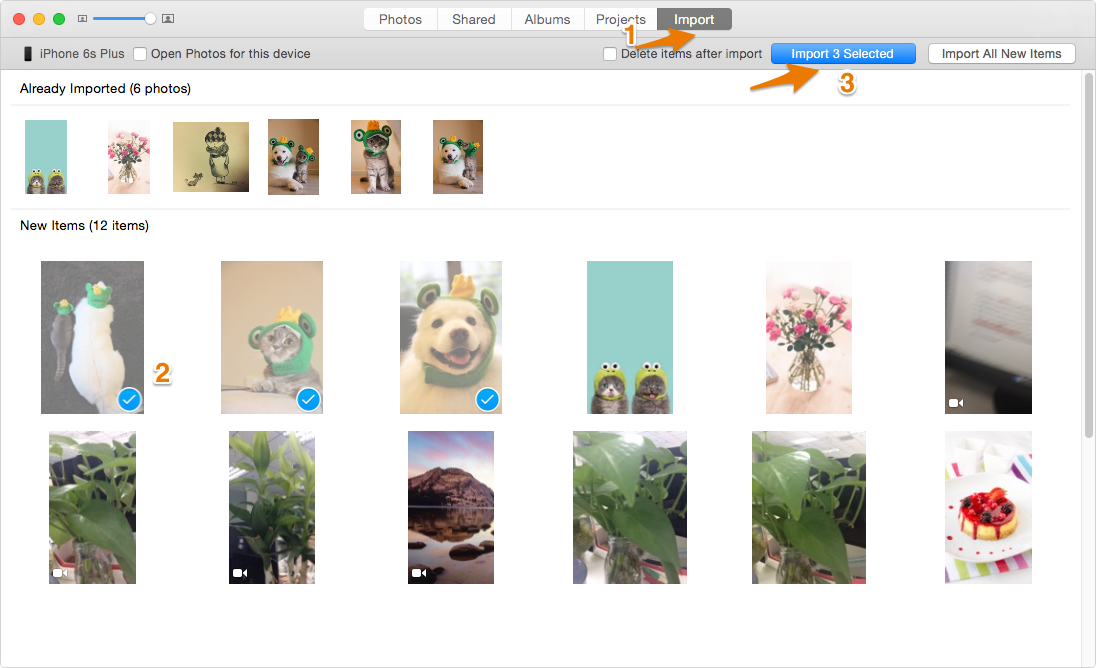
To transfer photos in Camera Roll from your iPhone 6s or iPhone 6s Plus to Mac, the Photos app is the way to go. It works on Mac OS X 10.10.3 and later.
Step 1. Connect your iPhone 6s or iPhone 6s Plus to Mac, and open Photos app from the Launchpad.
Step 2. You can click Import All New Items or manually select multiple photos, and then click Import XX Selected to transfer photos from iPhone 6s to Mac.
Step 3. Then the newly imported photos will show in an album named "Last Import". You can also find the photos in the All Photos album.

Transfer Photos from iPhone 6s/6s Plus to Mac with Photos
If you want to use Image Capture instead of Photos app to transfer iPhone 6s photos to Mac, you can refer to this quick guide.
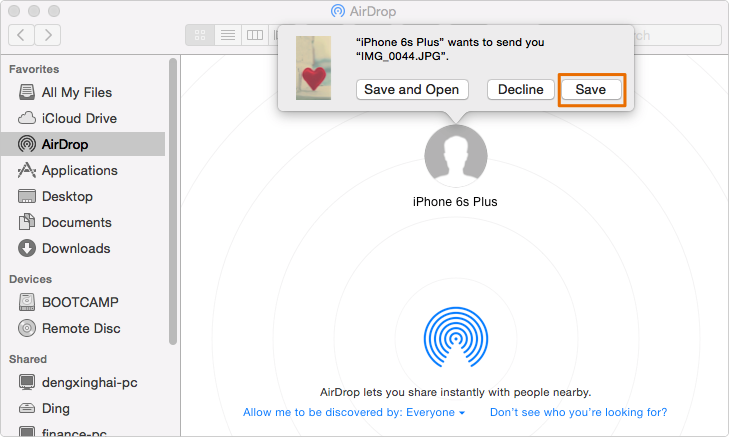
AirDrop is the quickest way to transfer single picture between iPhone and Mac. To transfer photos from your iPhone 6s to Mac with AirDrop, your Mac needs to be OS X Yosemite and later.
Step 1. Enable AirDrop on your Mac: Open Finder > Click on AirDrop > Click on Turn on Wi-Fi and Bluetooth to enable AirDrop > Set your Mac to be discovered by Contacts or Everyone.
Step 2.Enable AirDrop on your iPhone: Swipe up to open the Control Center > Tap on AirDrop > Choose from Contacts Only or Everyone as you need.
Step 3. Open the Photos app on your iPhone > Select a photo > Tap the Share button > Your Mac's name should appear > tap on it.
Step 4. On your Mac, click on Save or Save an Open to transfer the photo from your iPhone 6s (Plus) to your Mac.

Transfer Photos from iPhone 6s/6s Plus to Mac via AirDrop
Want to have a little bit more control on the transferring process? PrimoPhoto is here for you. With it, you can export/import all types of pictures (Camera Roll, Photo Library, Photo Stream, Photo Share, etc.) from iPhone 6s/6s Plus to Mac freely. PrimoPhoto allows you to access your iPhone photos via albums, which greatly saves your time when you need to find a particular photo within 1,000 pictures. In addition, PrimoPhoto is also capable of transferring video recordings (including 4K videos) from your iPhone 6s/6s Plus to Mac with full resolution.

Designed to fit effortlessly into your iPhone photo management
Download NowSteps to Transfer Pictures from iPhone 6s/6s Plus to Mac:
Step 1. Open PrimoPhoto, and connect your iPhone to Mac.
Step 2. In the Export to Computer section, select the photos in Camera Roll, Photo Library, or Albums.
Step 3. Click the Export button to save the photos on your Mac.

Transfer Photos from iPhone 6s to Mac with PrimoPhoto
There are some limitations on transferring photos from iPhone 6s to Mac using Photos or AirDrop: Photos cannot transfer iTunes synced pictures and it will be a little bit time consuming to find one photo among the whole camera roll; AirDrop requires Yosemite and later on Mac. With PrimoPhoto, all the mentioned issues can be perfectly solved. Start taking a tour now >

Fiona Wang Member of @PrimoSync team as well as an Apple fan, love to help more users solve various types of Apple related issues by writing iOS-how-to tutorials.