![]() by Abby on June 23, 2017 | NO COMMENT
by Abby on June 23, 2017 | NO COMMENT
Amazed by the new features like Instant Markup and want to know how to use it on iPhone after iOS 11 update? This article is going to give detailed instructions about how to use Instant Markup in iOS 11.

Primo iPhone Data Recovery has the ability to recover lost iPhone data after iOS 11 update without any barriers. Click here to download it and start a trial.
From Apple’s iOS 11 preview, there are some great new features like the new File app, the new Dock, Multitasking and so on. But most users are interested in a feature that can help us mark up PDF and screenshots faster and more easily: Instant Markup. It makes it possible to access and mark up anything on your iPhone/ or iPad just by tapping the Apple pencil on screen.
Since it’s pretty convenient to mark up anything you think of with Instant Markup in iOS 11, you may use this feature quite often on our daily life. So here in this post, we’ll give detailed explanation about how to access and use Instant Markup in iOS 11 on iPhone or iPad. What’s more, you can also get your iOS data back up if you get them lost after iOS 11 update with the help of Primo iPhone Data Recovery.
Image Credit: Redmond Pie
Can’t Miss: How to Fix Siri Not Working After iOS 11 Update >>
There are some tools in Instant Markup like marker, highlighter, pencil, eraser and magic rope, and you can change the color of your tools from white, red, black, blue, yellow and etc. Choose one of these tools to use it.
Tapping the More button in the bottom right corner of the screen, and you’ll see four additional tools that you can use to edit your screenshots with Instant Markup:
The screenshots you edited with Instant Markup will not be saved to Photo library and you can save them before closing the Instant Markup. Just tap Done from the upper left corner > choose Save to Photos > and you can tap Deleted Screenshot if you don’t want to save the marked screenshot.
For most users, the main reason of using Instant Markup is to share what they think of with friends. Tap Share icon from the upper right corner in Instant Markup screen > select how you want to share the screenshot > choose the contact information and send it.
There are chances that you may want to mark up your screenshot of the pages you visit as PDFs, and it’s quite easy with Instant Markup. Tap the Share Sheet extension and slide the bottom bar until you see Markup as PDF > tap it and it’ll be opened in Mark Up tool > tap on the marker icon from top right and toolbar will show up at the bottom.
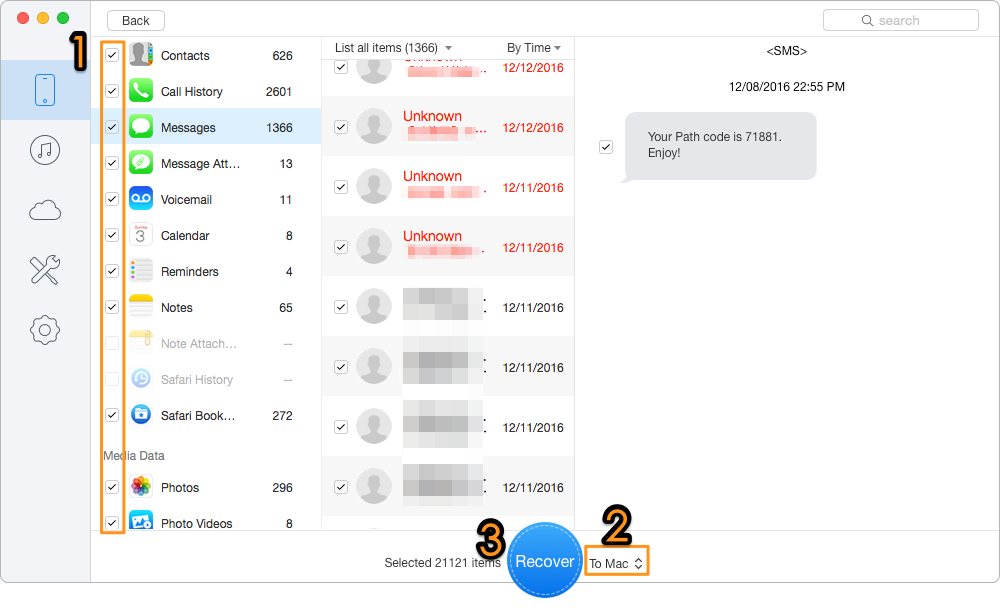
It seems that it’s inevitable for iPhone/iPad users to get some iOS data lost after every iOS update, so there are possibilities that we may lose some important data on iPhone after iOS 11 update. If you are one of the unlucky ones, just refer to this article to know how to recover lost iPhone data after iOS 11 update. It offers an impressive iOS data recovery tool called Primo iPhone Data Recovery to help you recover lost iOS data after iOS 11 update no matter you have backups or not.
How to Bring Your Lost iOS Data Backup After iOS 11 Update
Also Read: How to Recover Lost iPhone Messages After iOS 11 Update >>
You should have known how to use Instant Markup in iOS 11 on iPhone or iPad, and there may be more other usages about this tool. You can leave comments to share with us. In addition, Primo iPhone Data Recovery is definitely a good helper to get lost iOS data back after iOS 11 update. Just download it and start a free trial now >>

Abby Member of @PrimoSync team, an optimistic Apple user, willing to share solutions about iOS related problems.
Get Up-to-the-minute iPhone Tips & Enjoy Awesome Deals.
![]()
![]()
Design Simple and Beautiful Software
with Passion & Love